
How to add an account to Facebook Business Manager
Facebook Business Manager’s new layout is a bit tricky, but this guide should make it easy for you and solve all of your problems, from either an ad executive or client perspective.
This instruction guide covers all steps from both the ad executive and client sides, so you can see what is happening at their end, while you complete the steps from your end.
Add an account to a Facebook Business Manager
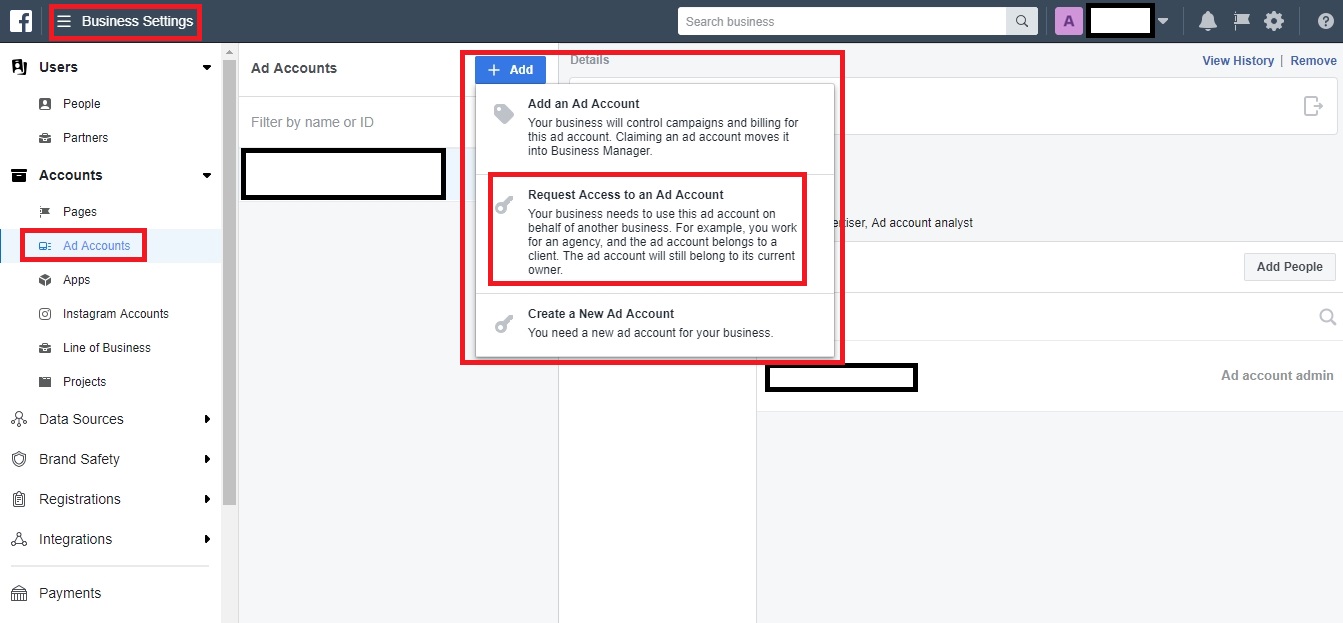
Step 1 – The ad executive will need to navigate to Business Settings in their dropdown menu, then go to Ad Accounts, then 3 options will appear.
a. Add an Ad Account – This will transfer ownership of an ad account to your business manager. Only do this for ad accounts you personally own, not for client accounts.
b. Create a New Ad Account – This will create a brand new account, which will also be owned by the business manager. You can do this if you want to have ownership and control the billing, such as paying for the ads and billing the client later.
c. Request Access to an Ad Account – The middle option is likely the one you need, as it gives you permission to access and manage an ad account, but the client retains ownership of their ad account.
Step 2 – After clicking the button to add a new account, you will get a popup giving you 2 methods.
a. Have the client add the manager – This is the bottom option, and Facebook lists the instructions, along with a code.
b. Have the client give the ad executive their account number – This is the top option, where you simply type the client’s ad account ID. I find this option is the easiest, so the next steps will follow this path. But if you are having trouble, revert back to this step and try option A.

Step 3 – If the client already has an ad account manager, then simply click on the down arrow in the top right corner of Facebook, and go to Manage Ads.
If they don’t have an ad account as yet, they will need to click in the same area to create a new personal account, or for large businesses with employees, it is better to create a Business Manager account (which you can still share access with in the same way) at business.facebook.com and then create an ad account inside it.
Either one will work fine, and if you are confused, just create a regular ad account, and you can always bring it inside the Business Manager account at a later stage.

Step 4 – Once inside the ad manager, the client can find their ad account number by clicking on the 2nd dropdown in the top left corner. If you have multiple accounts, they will all show there, and you can choose the one you wish to provide access to.

Step 5 – Once the client has provided the ad executive with the account number, they will enter it on to their page, and options will appear for the desired role.
We normally select Ad account advertiser (analyst will be automatically ticked as it is a lower role). However, if the client wants the ad executive to manage additional aspects such as posts and settings, then choose the top role of Ad account admin.

Step 6 – This will now send a request to confirm permission to the client

Step 7 – The client will receive a notification from Facebook. They will need to click it to be redirected to the page where they can confirm permission for the ad executive to access their account.

Step 8 – Clicking the notification will take you into the Ad account roles section in the clients settings, where you can click the Respond to Request button

Assign a Person to an Ad Account
Step 1 – The ad executive will now need to add themselves to the ad account.
Go to business settings, then ad accounts, the click Add People. You will either add yourself, or if you have other staff members in your Business Manager, you can assign them to work on the ad accounts.

Add a page to a Facebook Business Manager
Step 1 – The ad executive will now need to request access to the page that the ads will run under.
Go to business settings, then pages, then click Add, and then you will get a popup with 3 options. To add the page for a client, choose the middle option: Request Access to a Page.

Step 2 – You will then get another popup screen where you can search for the desired page by typing the name, or you can directly enter the page url.
Choose the Page advertiser option (analyst will be selected automatically), or if the client wants you to make posts and handle other aspects of the page management, then you can choose the appropriate higher level. The client will also get a notification here asking them to confirm the page access.

Making sure the account is setup properly
Step 1 – The ad executive should navigate to the Ad Account settings page, and make sure the correct ad account is selected in the dropdown in the upper middle of the page.
Check the Ad Account Name, Currency, Business Name, Business Address, and any other appropriate fields, to make sure the correct info has been entered.
Currency may be the most important one. However, once set up, Facebook does not allow you to change it, and you may need to consider whether to continue as is, or create a new account with the correct currency.

Step 2 – On the left menu, 2 spots under the Ad Accounts tab, is the Payment Settings tab.
If it is not setup yet, you will need to add a payment method. This is essential for you to do before you start running ads.
You can also set the Account Spending Limit here if you desire, but I normally leave this setting.
